
 Vitalii Holben
How to Take a Website Screenshot with Go and chromedp
Learn how to capture website screenshots with Go using two approaches: chromedp for local browser automation and a screenshot API for production. Working code, full-page captures, mobile viewports, and honest comparison.
Today I want to show you how to take website screenshots with Go. When I first looked into this, I assumed Go wouldn't have much to offer compared to Python or Node.js, where Playwright and Puppeteer are already the default tools. Turns out Go has a solid library called chromedp that talks to Chrome directly through the DevTools Protocol, with zero external dependencies.
In this guide I'll walk through everything chromedp can do for website screenshots. We'll start with a basic script and build up to full-page captures, custom viewports, mobile emulation, element screenshots, and batch processing multiple URLs.
What you'll need
Before we start, make sure you have Go 1.21 or newer installed:
go versionYou'll also need Google Chrome or Chromium. chromedp runs it in headless mode behind the scenes. Check if it's there:
google-chrome --version
# or
chromium --version
If Chrome is in place, let's set up the project:
mkdir go-screenshots
cd go-screenshots
go mod init go-screenshots
Method 1: chromedp
chromedp is a Go library for controlling Chrome through the DevTools Protocol. No external dependencies, no WebDriver wrappers, just direct communication with the browser over CDP. For Go developers it's the most natural choice, since it's written in pure Go.
Installation
go get github.com/chromedp/chromedpThat's all you need. No separate driver download, no 400 MB Chromium binary. chromedp finds the Chrome installation on your system automatically.
Basic screenshot
Create a file called main.go:
package main

import (
	"context"
	"fmt"
	"log"
	"os"

	"github.com/chromedp/chromedp"
)

func main() {
	ctx, cancel := chromedp.NewContext(context.Background())
	defer cancel()

	var buf []byte
	if err := chromedp.Run(ctx,
		chromedp.Navigate("https://news.ycombinator.com"),
		chromedp.CaptureScreenshot(&buf),
	); err != nil {
		log.Fatal(err)
	}

	if err := os.WriteFile("hackernews.png", buf, 0644); err != nil {
		log.Fatal(err)
	}

	fmt.Println("Saved: hackernews.png")
}
Run it:
go run main.go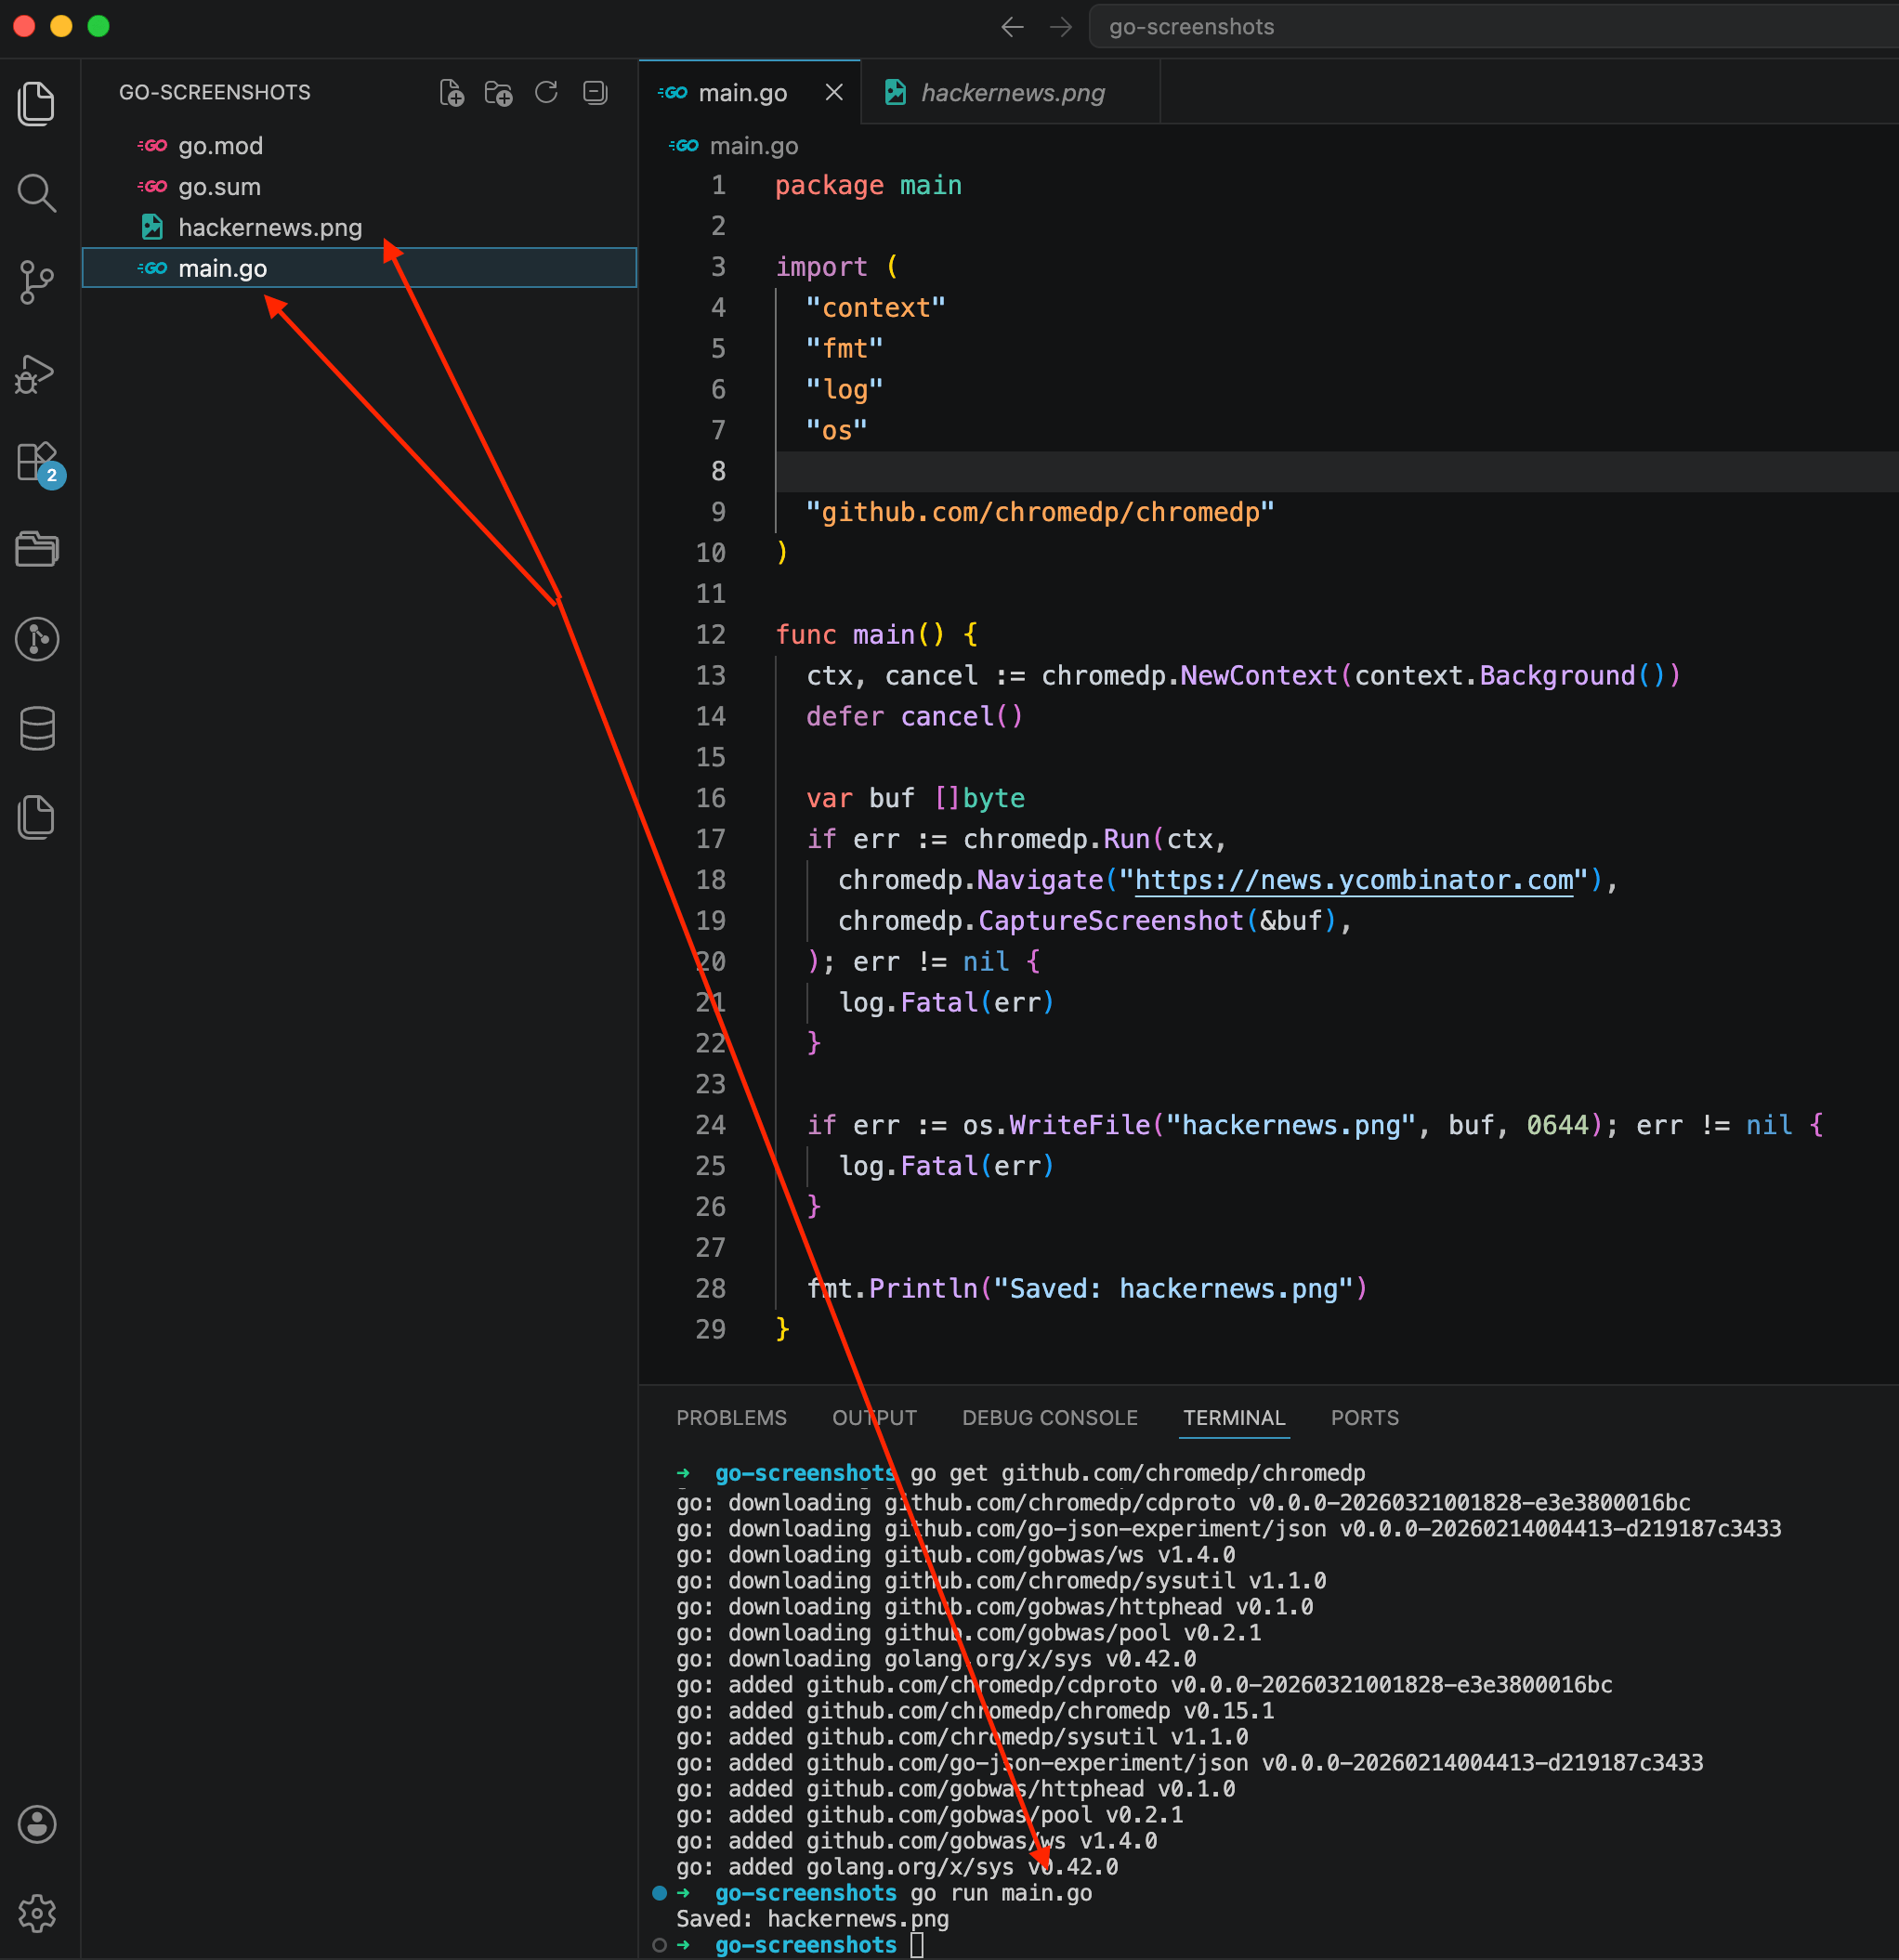
The terminal shows the whole process: go get pulled chromedp and its dependencies, go run main.go launched the script, and a couple of seconds later it printed Saved: hackernews.png. The file appeared in the sidebar on the left. The code in the editor is 29 lines, nothing extra.
Notice the pattern here: chromedp.NewContext creates a context, chromedp.Run accepts a chain of actions (navigate, capture), and errors are handled the standard Go way. No magic.
Now let's open the file itself:
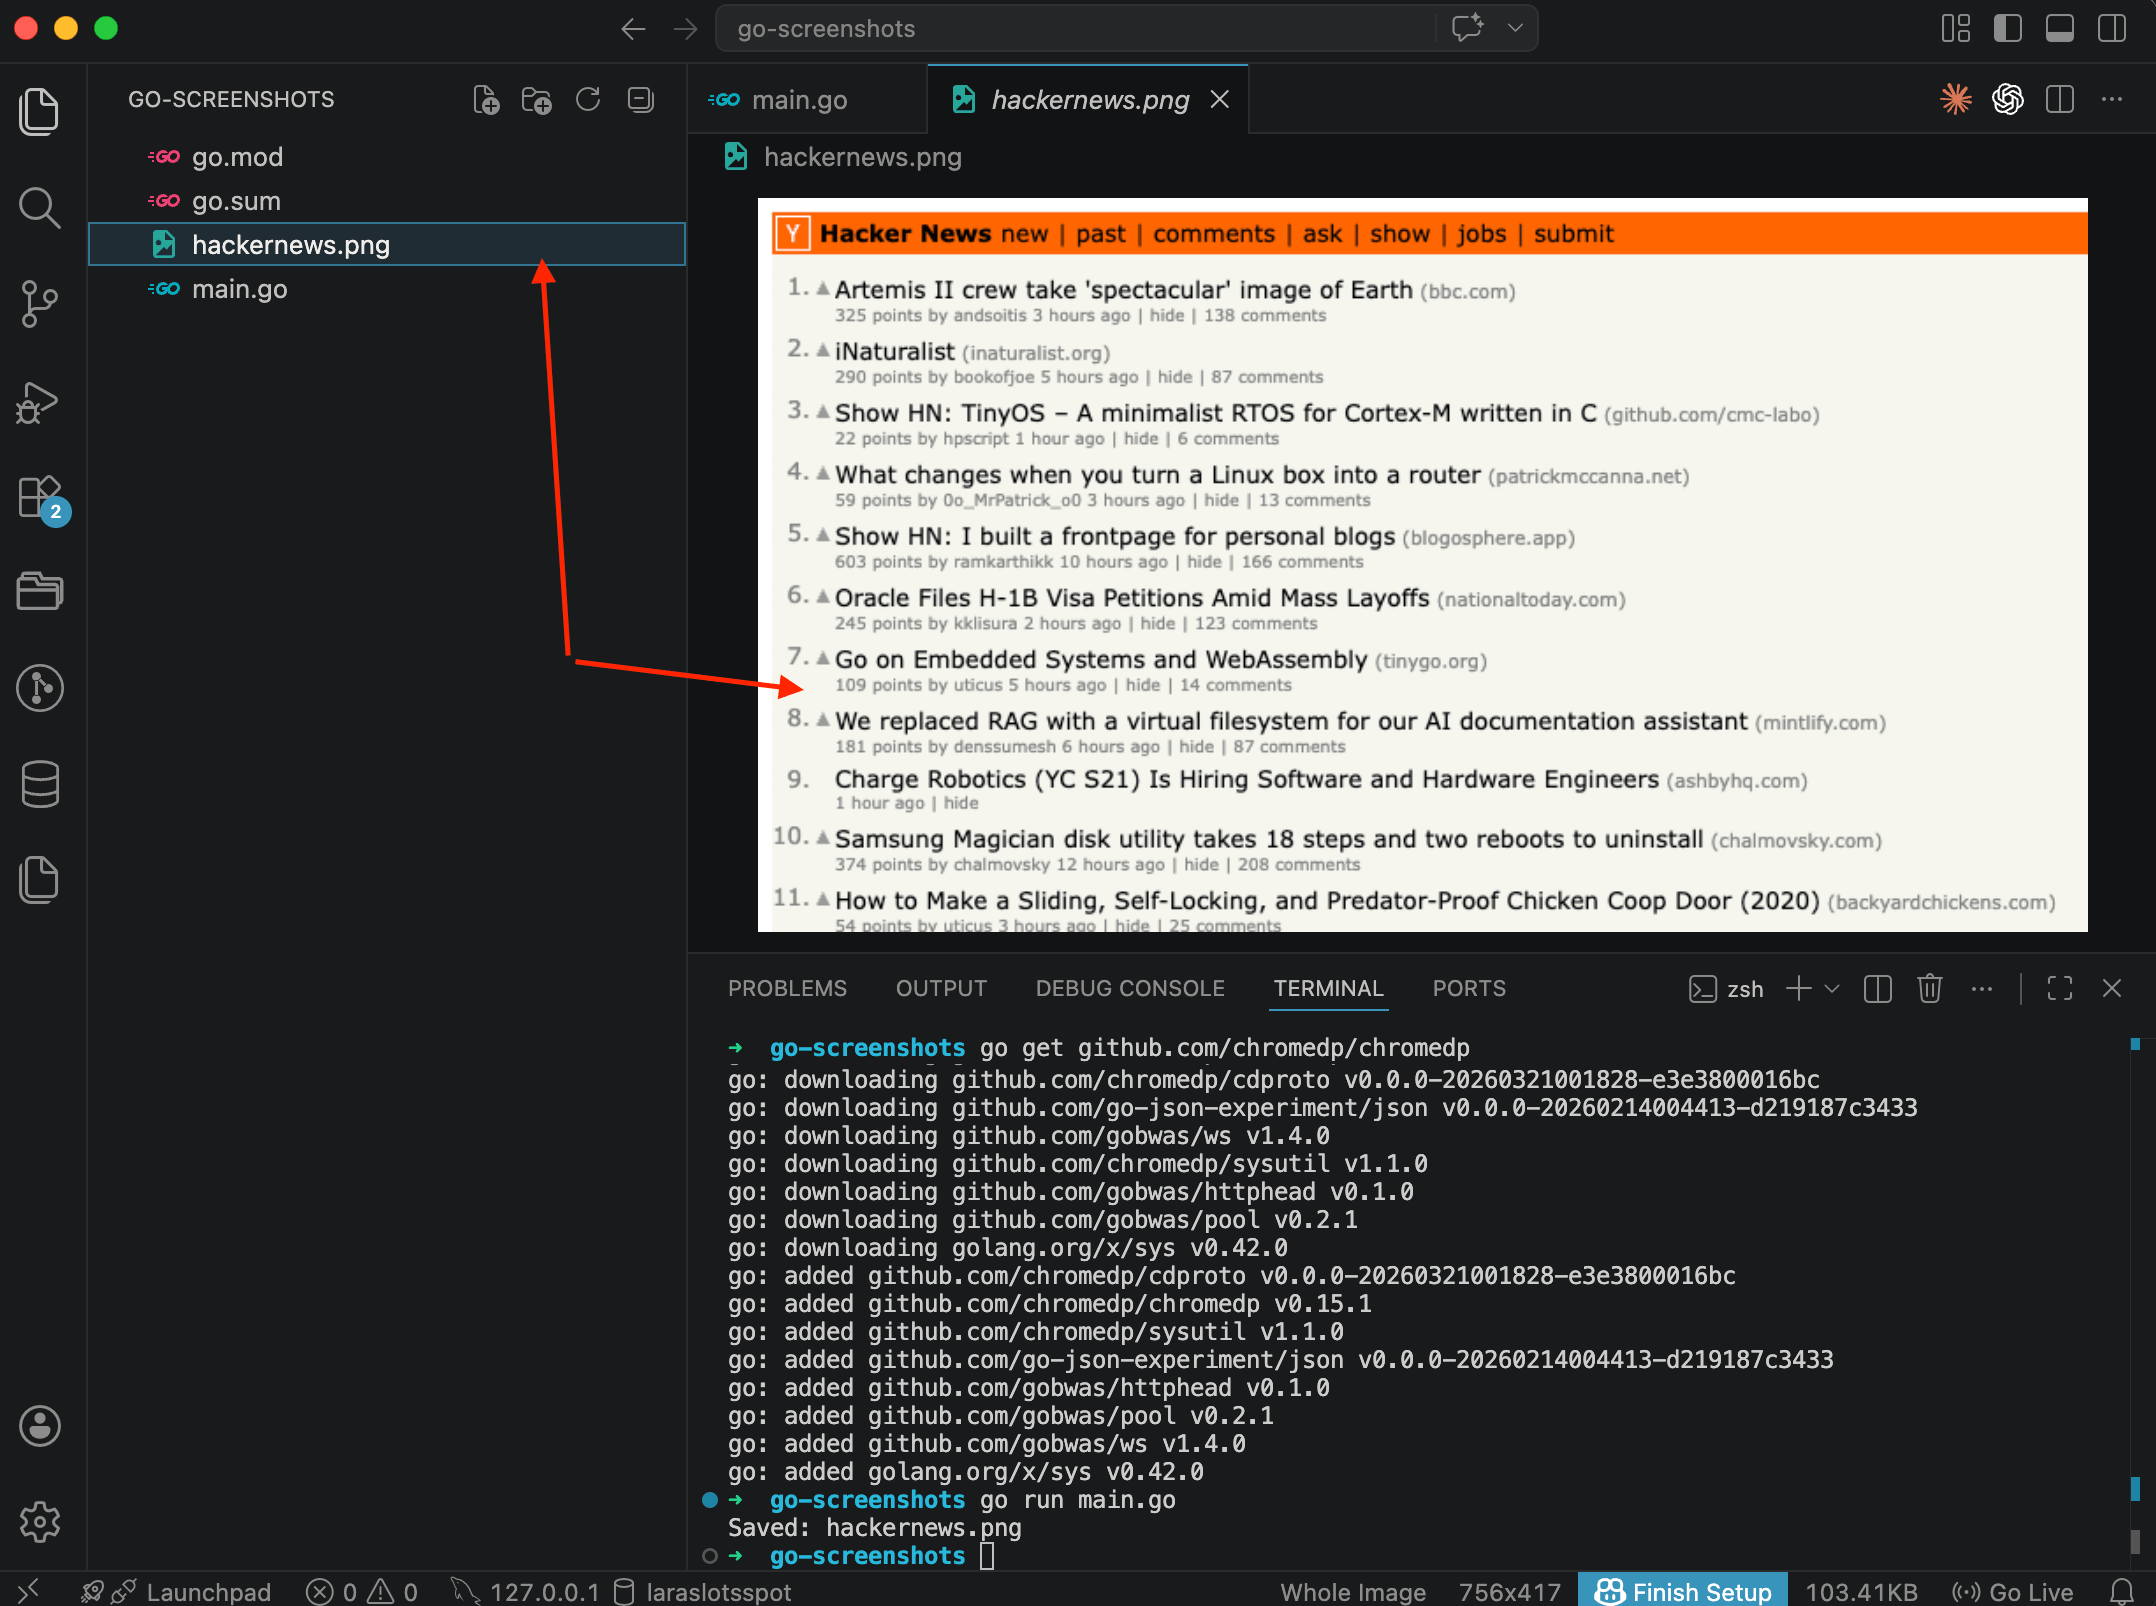
Hacker News with the orange header and list of posts. The screenshot captured only the visible portion, whatever fits in the browser window. Content below the viewport didn't make it into the image. The dimensions are 756x417, which is chromedp's default viewport (800x600 minus Chrome UI). For most tasks that's too small, but we'll fix that next.
Full-page screenshot
Usually you need the entire page, from top to bottom. chromedp handles this with FullScreenshot (we cover the nuances of full-page capture on the feature page):
package main

import (
	"context"
	"fmt"
	"log"
	"os"

	"github.com/chromedp/chromedp"
)

func main() {
	ctx, cancel := chromedp.NewContext(context.Background())
	defer cancel()

	var buf []byte
	if err := chromedp.Run(ctx,
		chromedp.Navigate("https://news.ycombinator.com"),
		chromedp.FullScreenshot(&buf, 100),
	); err != nil {
		log.Fatal(err)
	}

	if err := os.WriteFile("hackernews_full.png", buf, 0644); err != nil {
		log.Fatal(err)
	}

	fmt.Println("Saved: hackernews_full.png")
}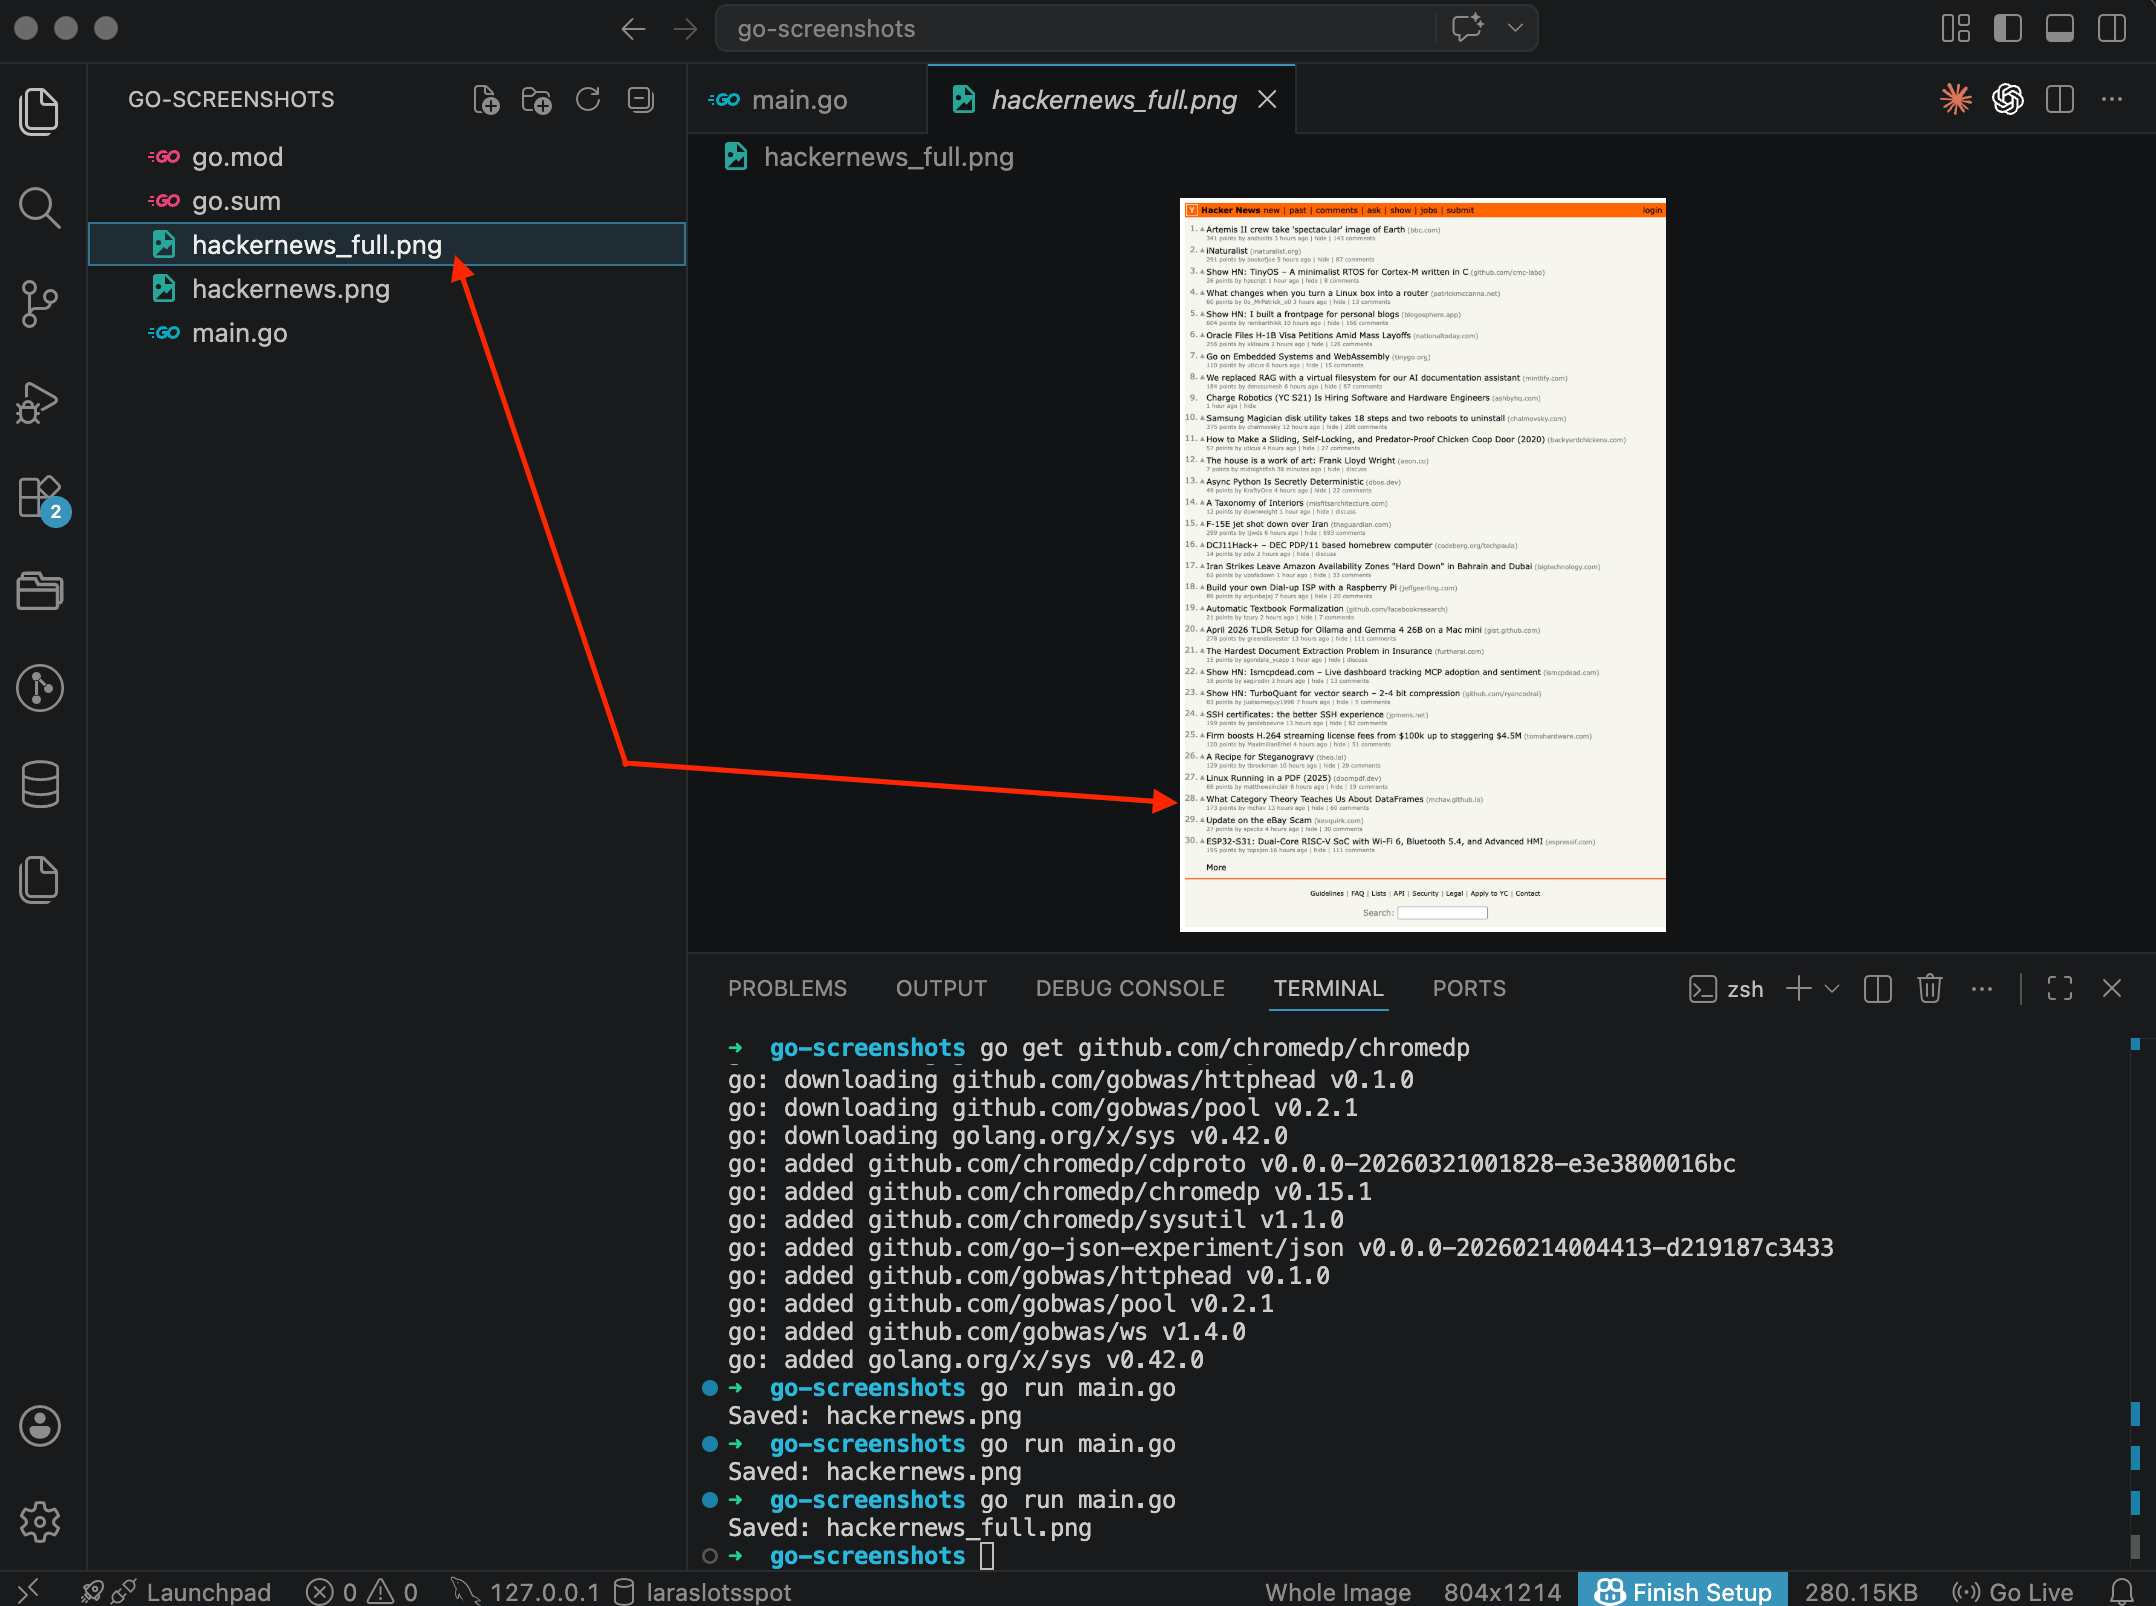
The difference is obvious right away. The image is much taller now, from the header all the way down to the footer. All 30 posts, navigation links, the search bar at the bottom. In the VS Code preview you can see the entire page captured in one shot.
The 100 parameter is the image quality. When the value is 100, chromedp saves as PNG. Anything below 100 switches to JPEG. Easy to miss in the docs, but it matters.
Custom viewport
By default chromedp uses an 800x600 viewport. For most websites that's too narrow, and the layout might switch to a tablet or even mobile breakpoint. To set the size you want, use chromedp.EmulateViewport (our custom viewport feature wraps this into a single parameter):
package main

import (
	"context"
	"fmt"
	"log"
	"os"

	"github.com/chromedp/chromedp"
)

func main() {
	ctx, cancel := chromedp.NewContext(context.Background())
	defer cancel()

	var buf []byte
	if err := chromedp.Run(ctx,
		chromedp.EmulateViewport(1920, 1080),
		chromedp.Navigate("https://github.com"),
		chromedp.CaptureScreenshot(&buf),
	); err != nil {
		log.Fatal(err)
	}

	if err := os.WriteFile("github_1080p.png", buf, 0644); err != nil {
		log.Fatal(err)
	}

	fmt.Println("Saved: github_1080p.png")
}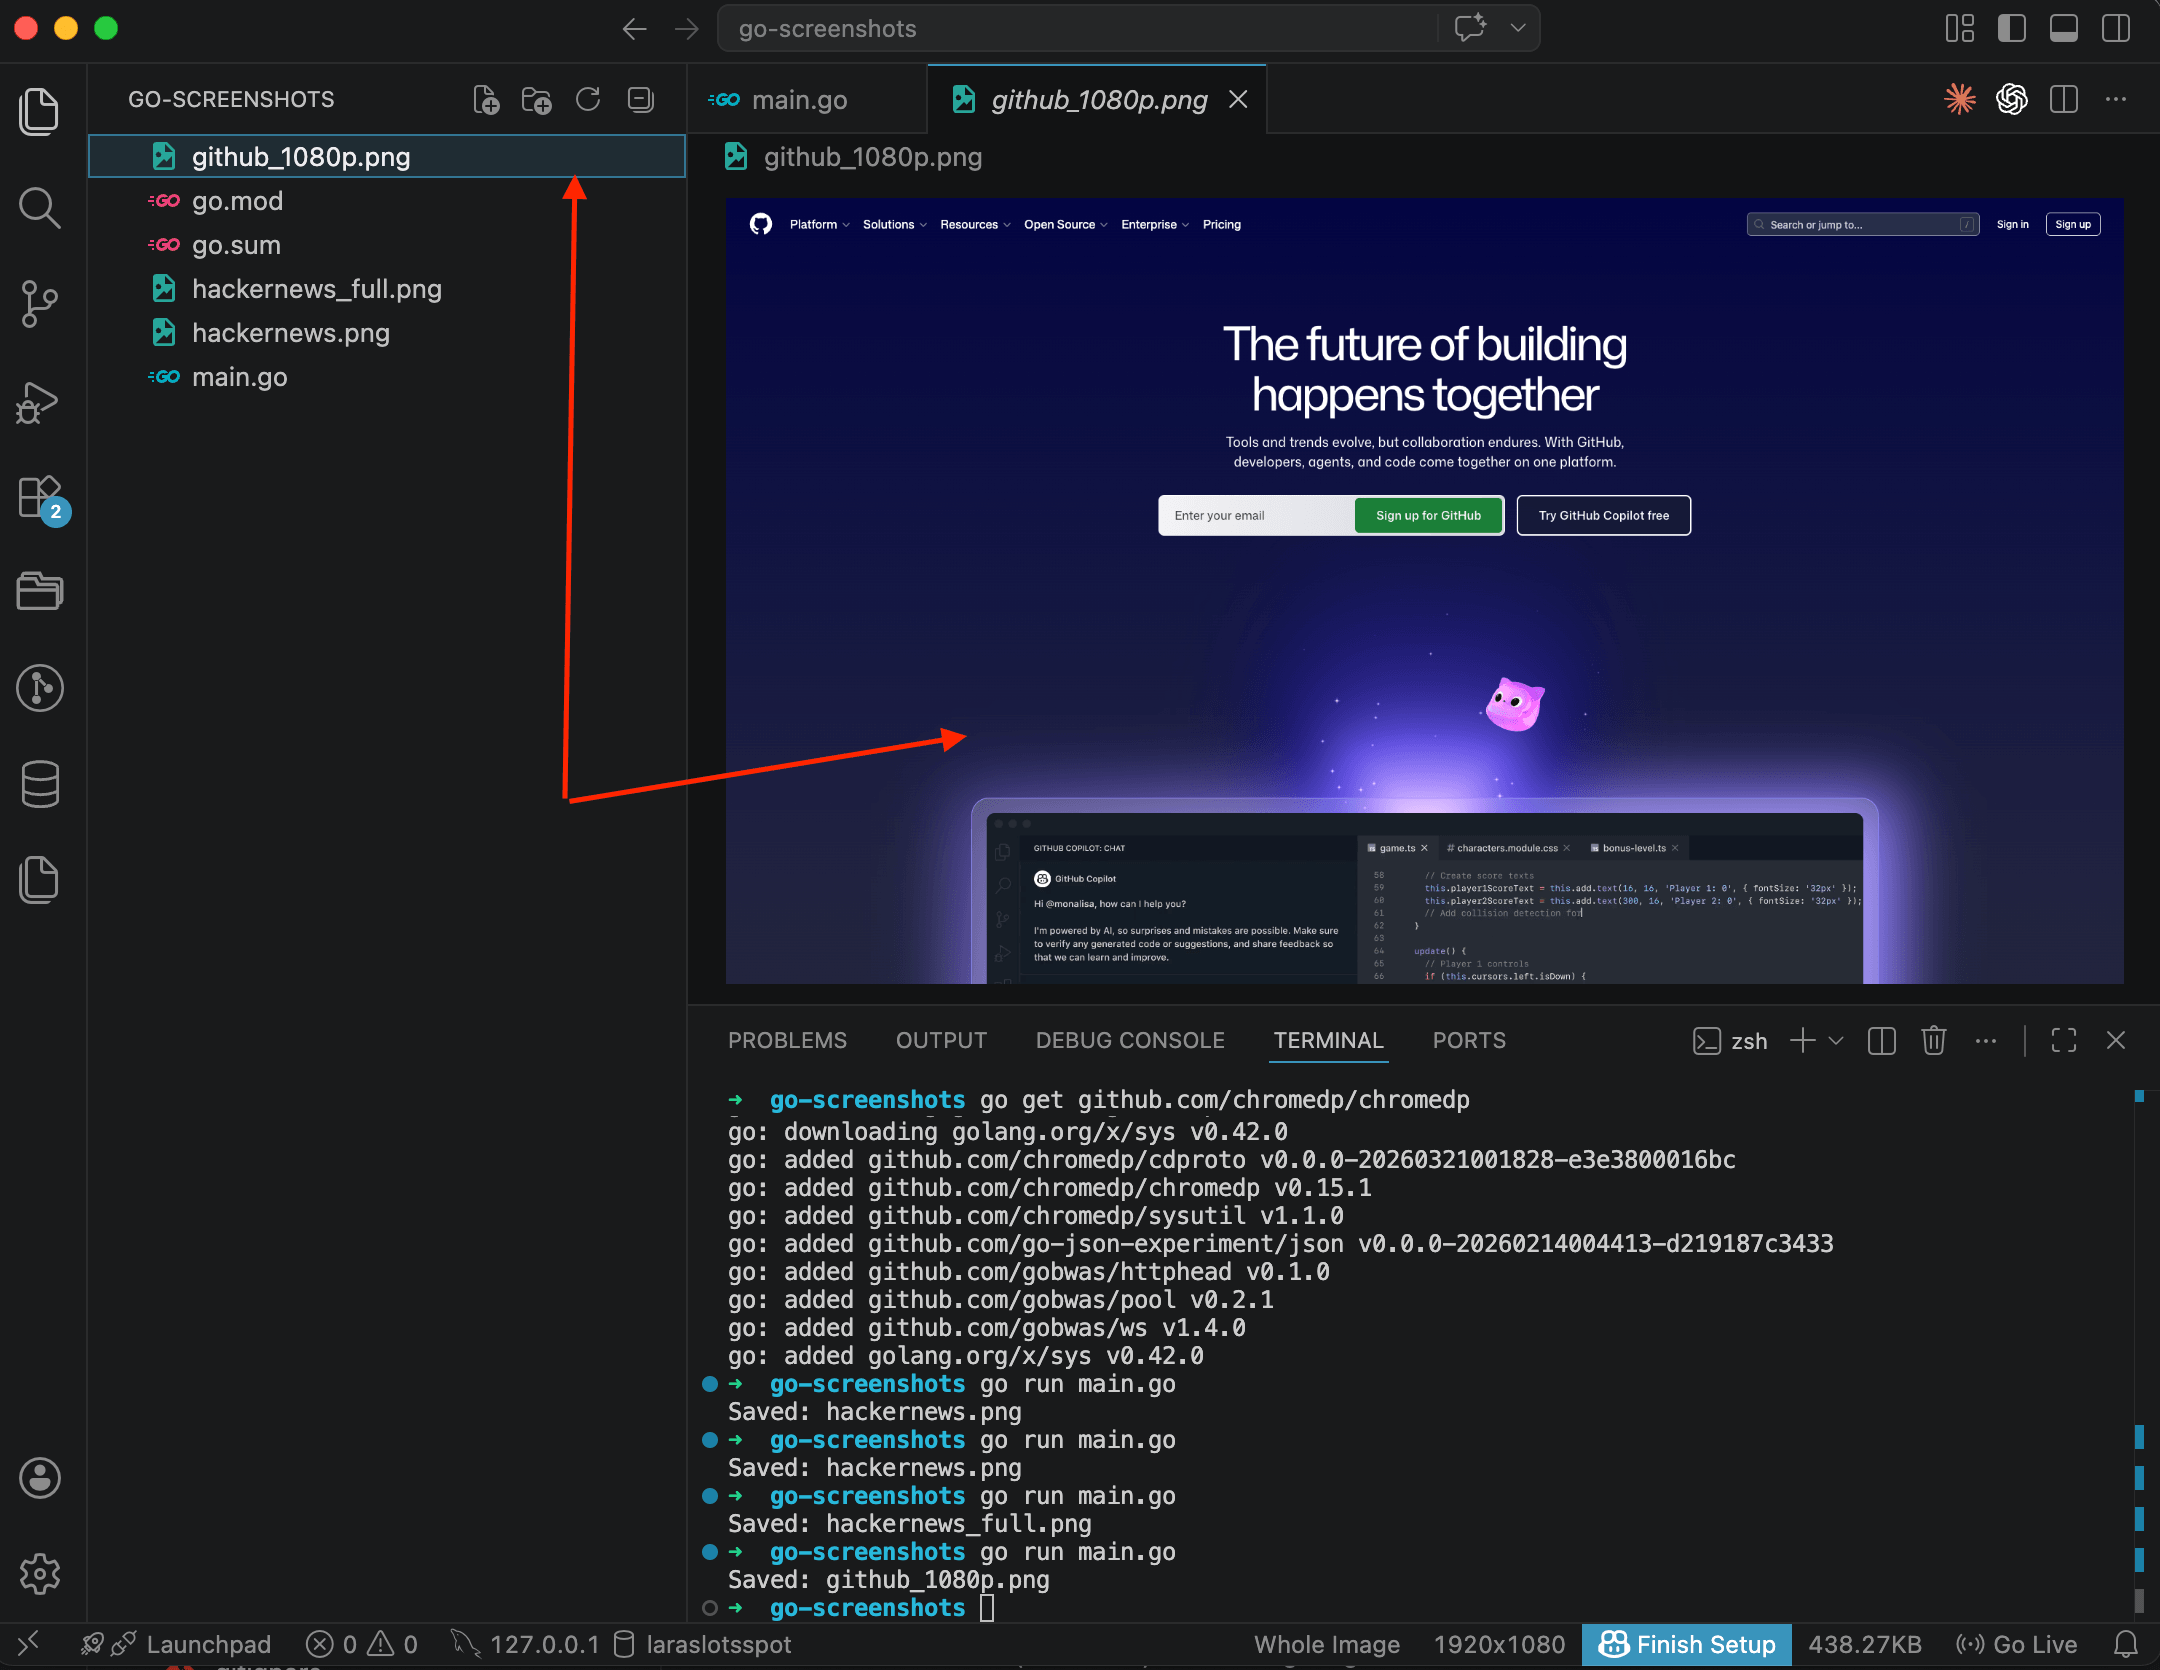
Now the page renders at full 1920x1080 pixels. GitHub shows the desktop navigation, search bar, Copilot section, everything you'd see on a real monitor. Compare this with the earlier screenshots at the default 800x600 and the difference is clear.
One thing to remember: call EmulateViewport before Navigate. If you call it after, the page is already rendered with the default viewport, and CSS media queries won't recalculate.
Mobile screenshot
For mobile emulation you need more than just a smaller viewport. You also have to set the device scale factor and a mobile user-agent string. chromedp supports this through the emulation package:
package main

import (
	"context"
	"fmt"
	"log"
	"os"

	"github.com/chromedp/cdproto/emulation"
	"github.com/chromedp/chromedp"
)

func main() {
	ctx, cancel := chromedp.NewContext(context.Background())
	defer cancel()

	var buf []byte
	if err := chromedp.Run(ctx,
		chromedp.ActionFunc(func(ctx context.Context) error {
			return emulation.SetDeviceMetricsOverride(390, 844, 3.0, true).Do(ctx)
		}),
		chromedp.ActionFunc(func(ctx context.Context) error {
			return emulation.SetUserAgentOverride(
				"Mozilla/5.0 (iPhone; CPU iPhone OS 17_0 like Mac OS X) AppleWebKit/605.1.15 (KHTML, like Gecko) Version/17.0 Mobile/15E148 Safari/604.1",
			).Do(ctx)
		}),
		chromedp.Navigate("https://github.com"),
		chromedp.CaptureScreenshot(&buf),
	); err != nil {
		log.Fatal(err)
	}

	if err := os.WriteFile("github_mobile.png", buf, 0644); err != nil {
		log.Fatal(err)
	}

	fmt.Println("Saved: github_mobile.png")
}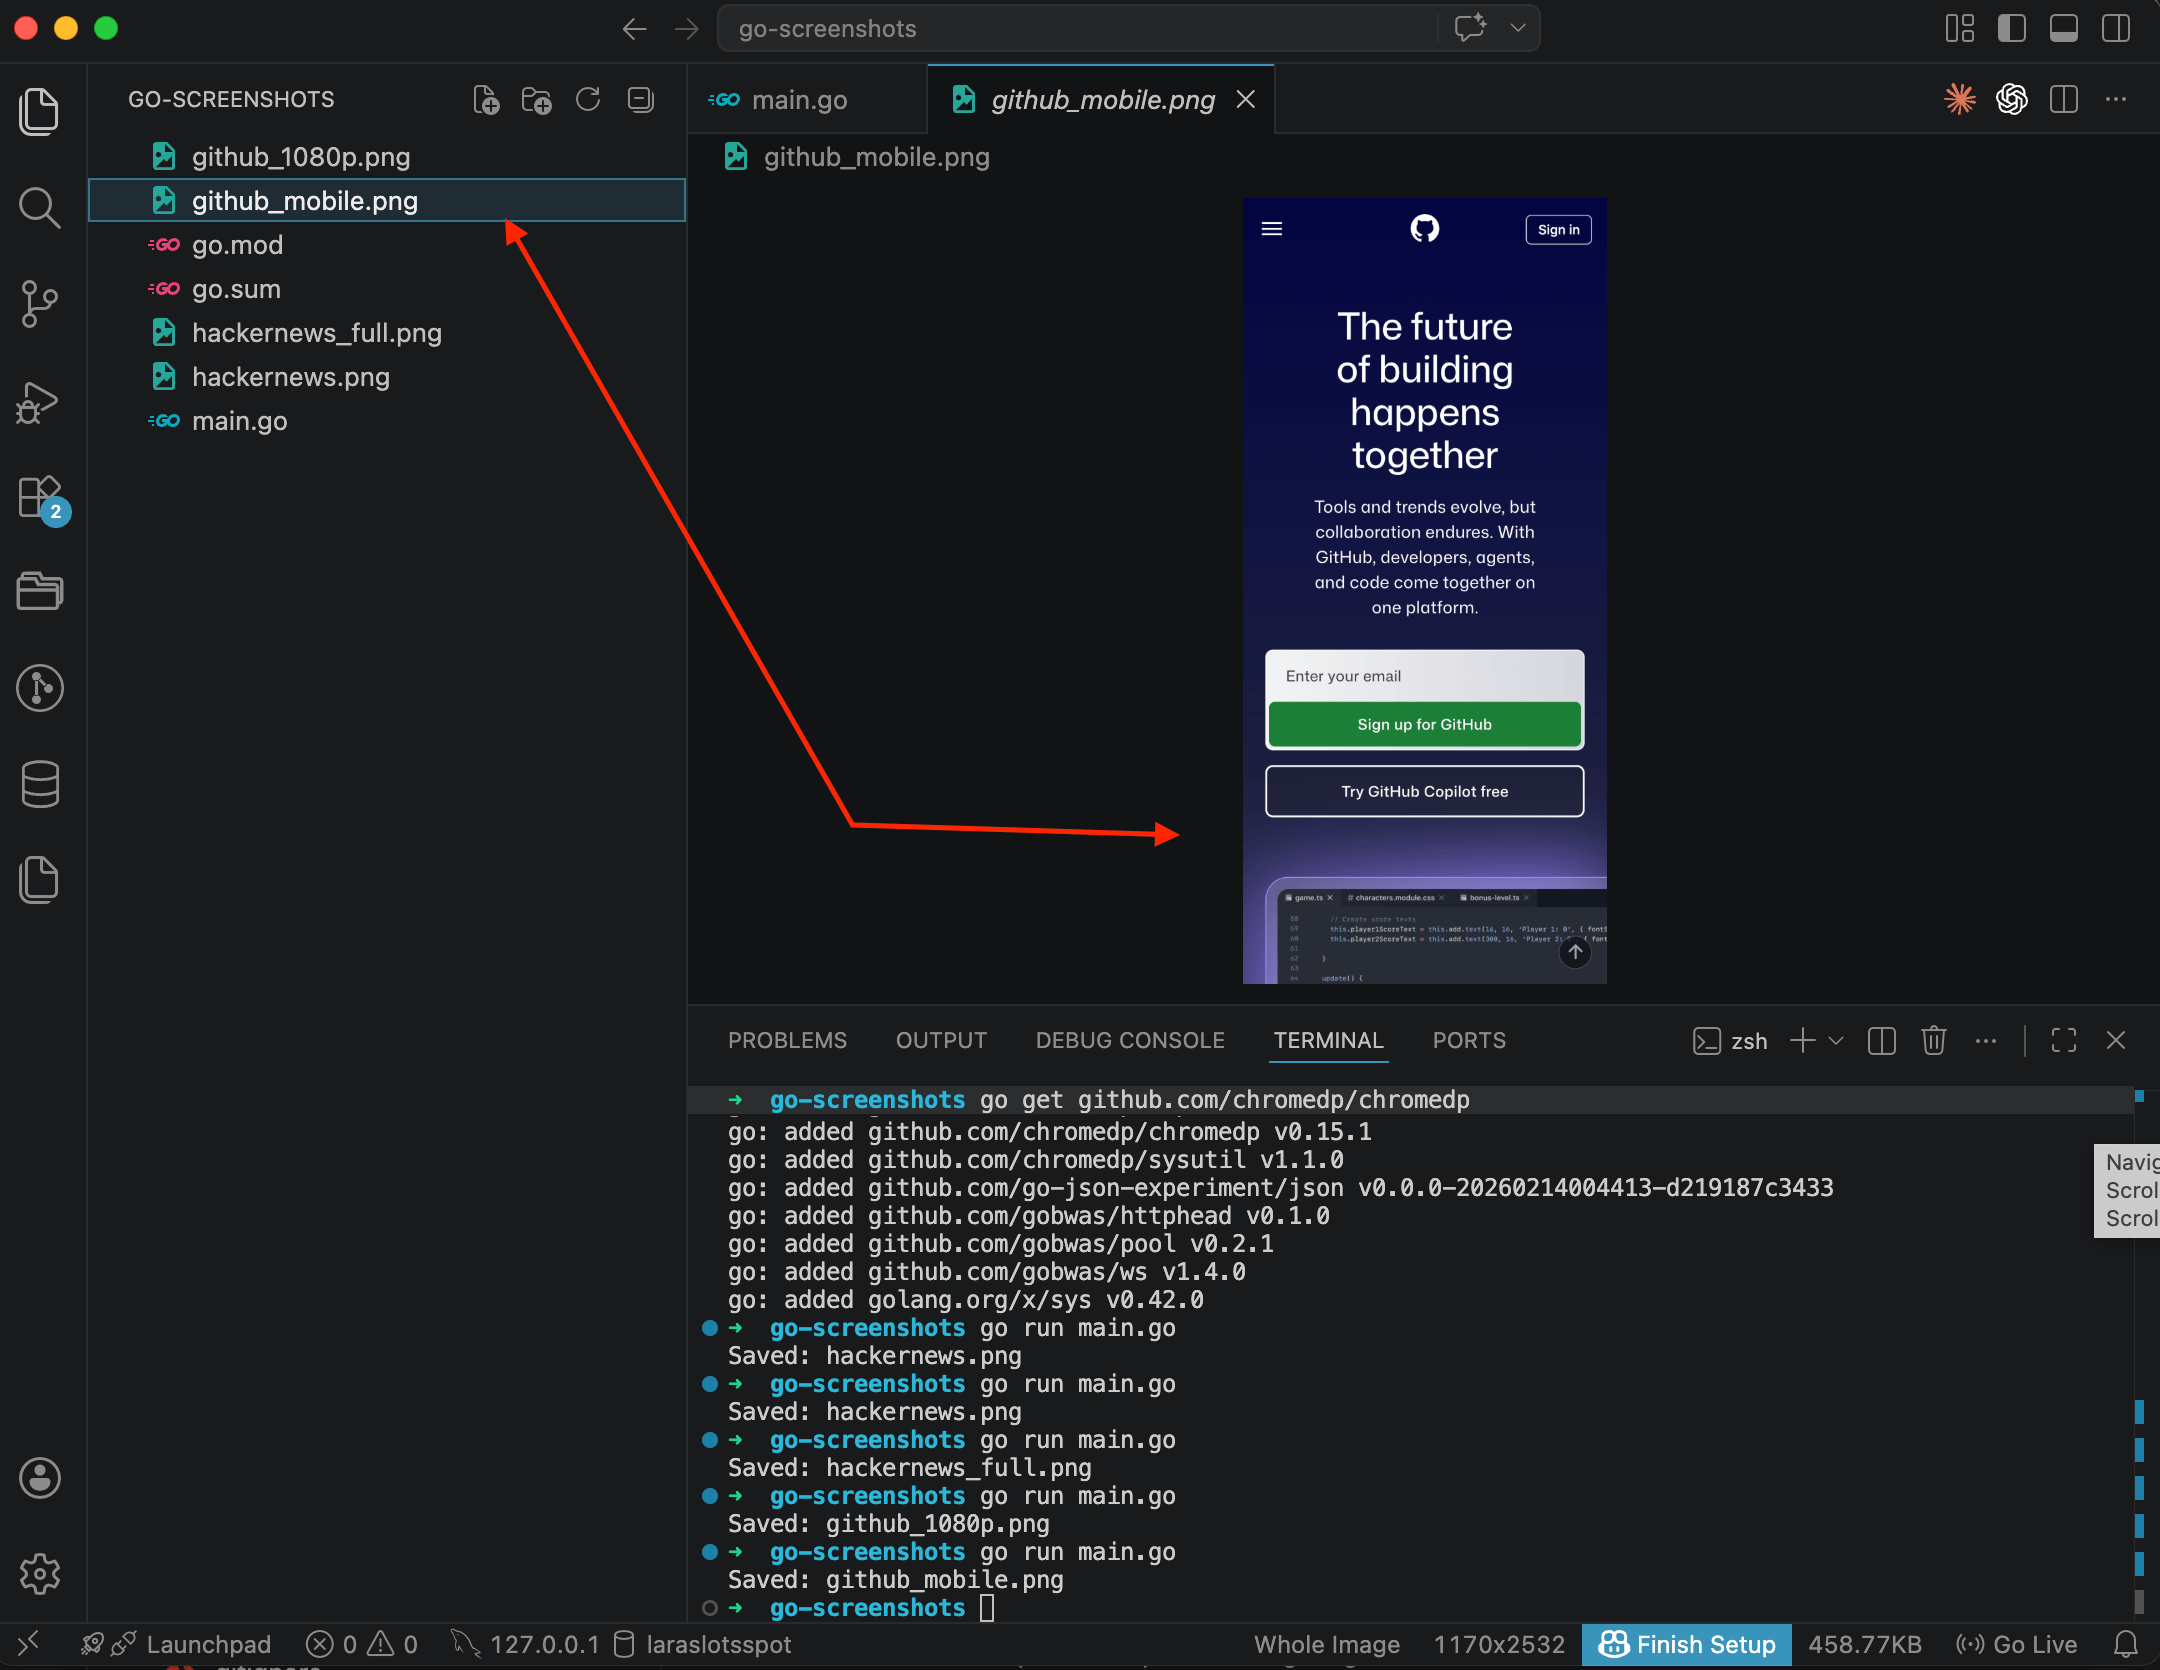
GitHub in mobile view: hamburger menu instead of the full navigation bar, vertical layout, touch-friendly "Sign up" and "Sign in" buttons. In the VS Code status bar you can see the dimensions, 1170x2532. That's 390x844 multiplied by the 3.0 device pixel ratio.
There's more code here than in Playwright, where you'd just write devices['iPhone 14']. In chromedp you manually specify width (390), height (844), pixel ratio (3.0), and the mobile flag (true). And the user-agent string goes separately. Not the most convenient setup, but you get full control over exactly what's being emulated.
Element screenshot
Sometimes you don't need the whole page, just one specific block: a form, a product card, a navigation bar. chromedp can capture a single element by its CSS selector:
package main

import (
	"context"
	"fmt"
	"log"
	"os"

	"github.com/chromedp/chromedp"
)

func main() {
	ctx, cancel := chromedp.NewContext(context.Background())
	defer cancel()

	var buf []byte
	if err := chromedp.Run(ctx,
		chromedp.Navigate("https://news.ycombinator.com"),
		chromedp.Screenshot("table", &buf, chromedp.NodeVisible),
	); err != nil {
		log.Fatal(err)
	}

	if err := os.WriteFile("hackernews_table.png", buf, 0644); err != nil {
		log.Fatal(err)
	}

	fmt.Println("Saved: hackernews_table.png")
}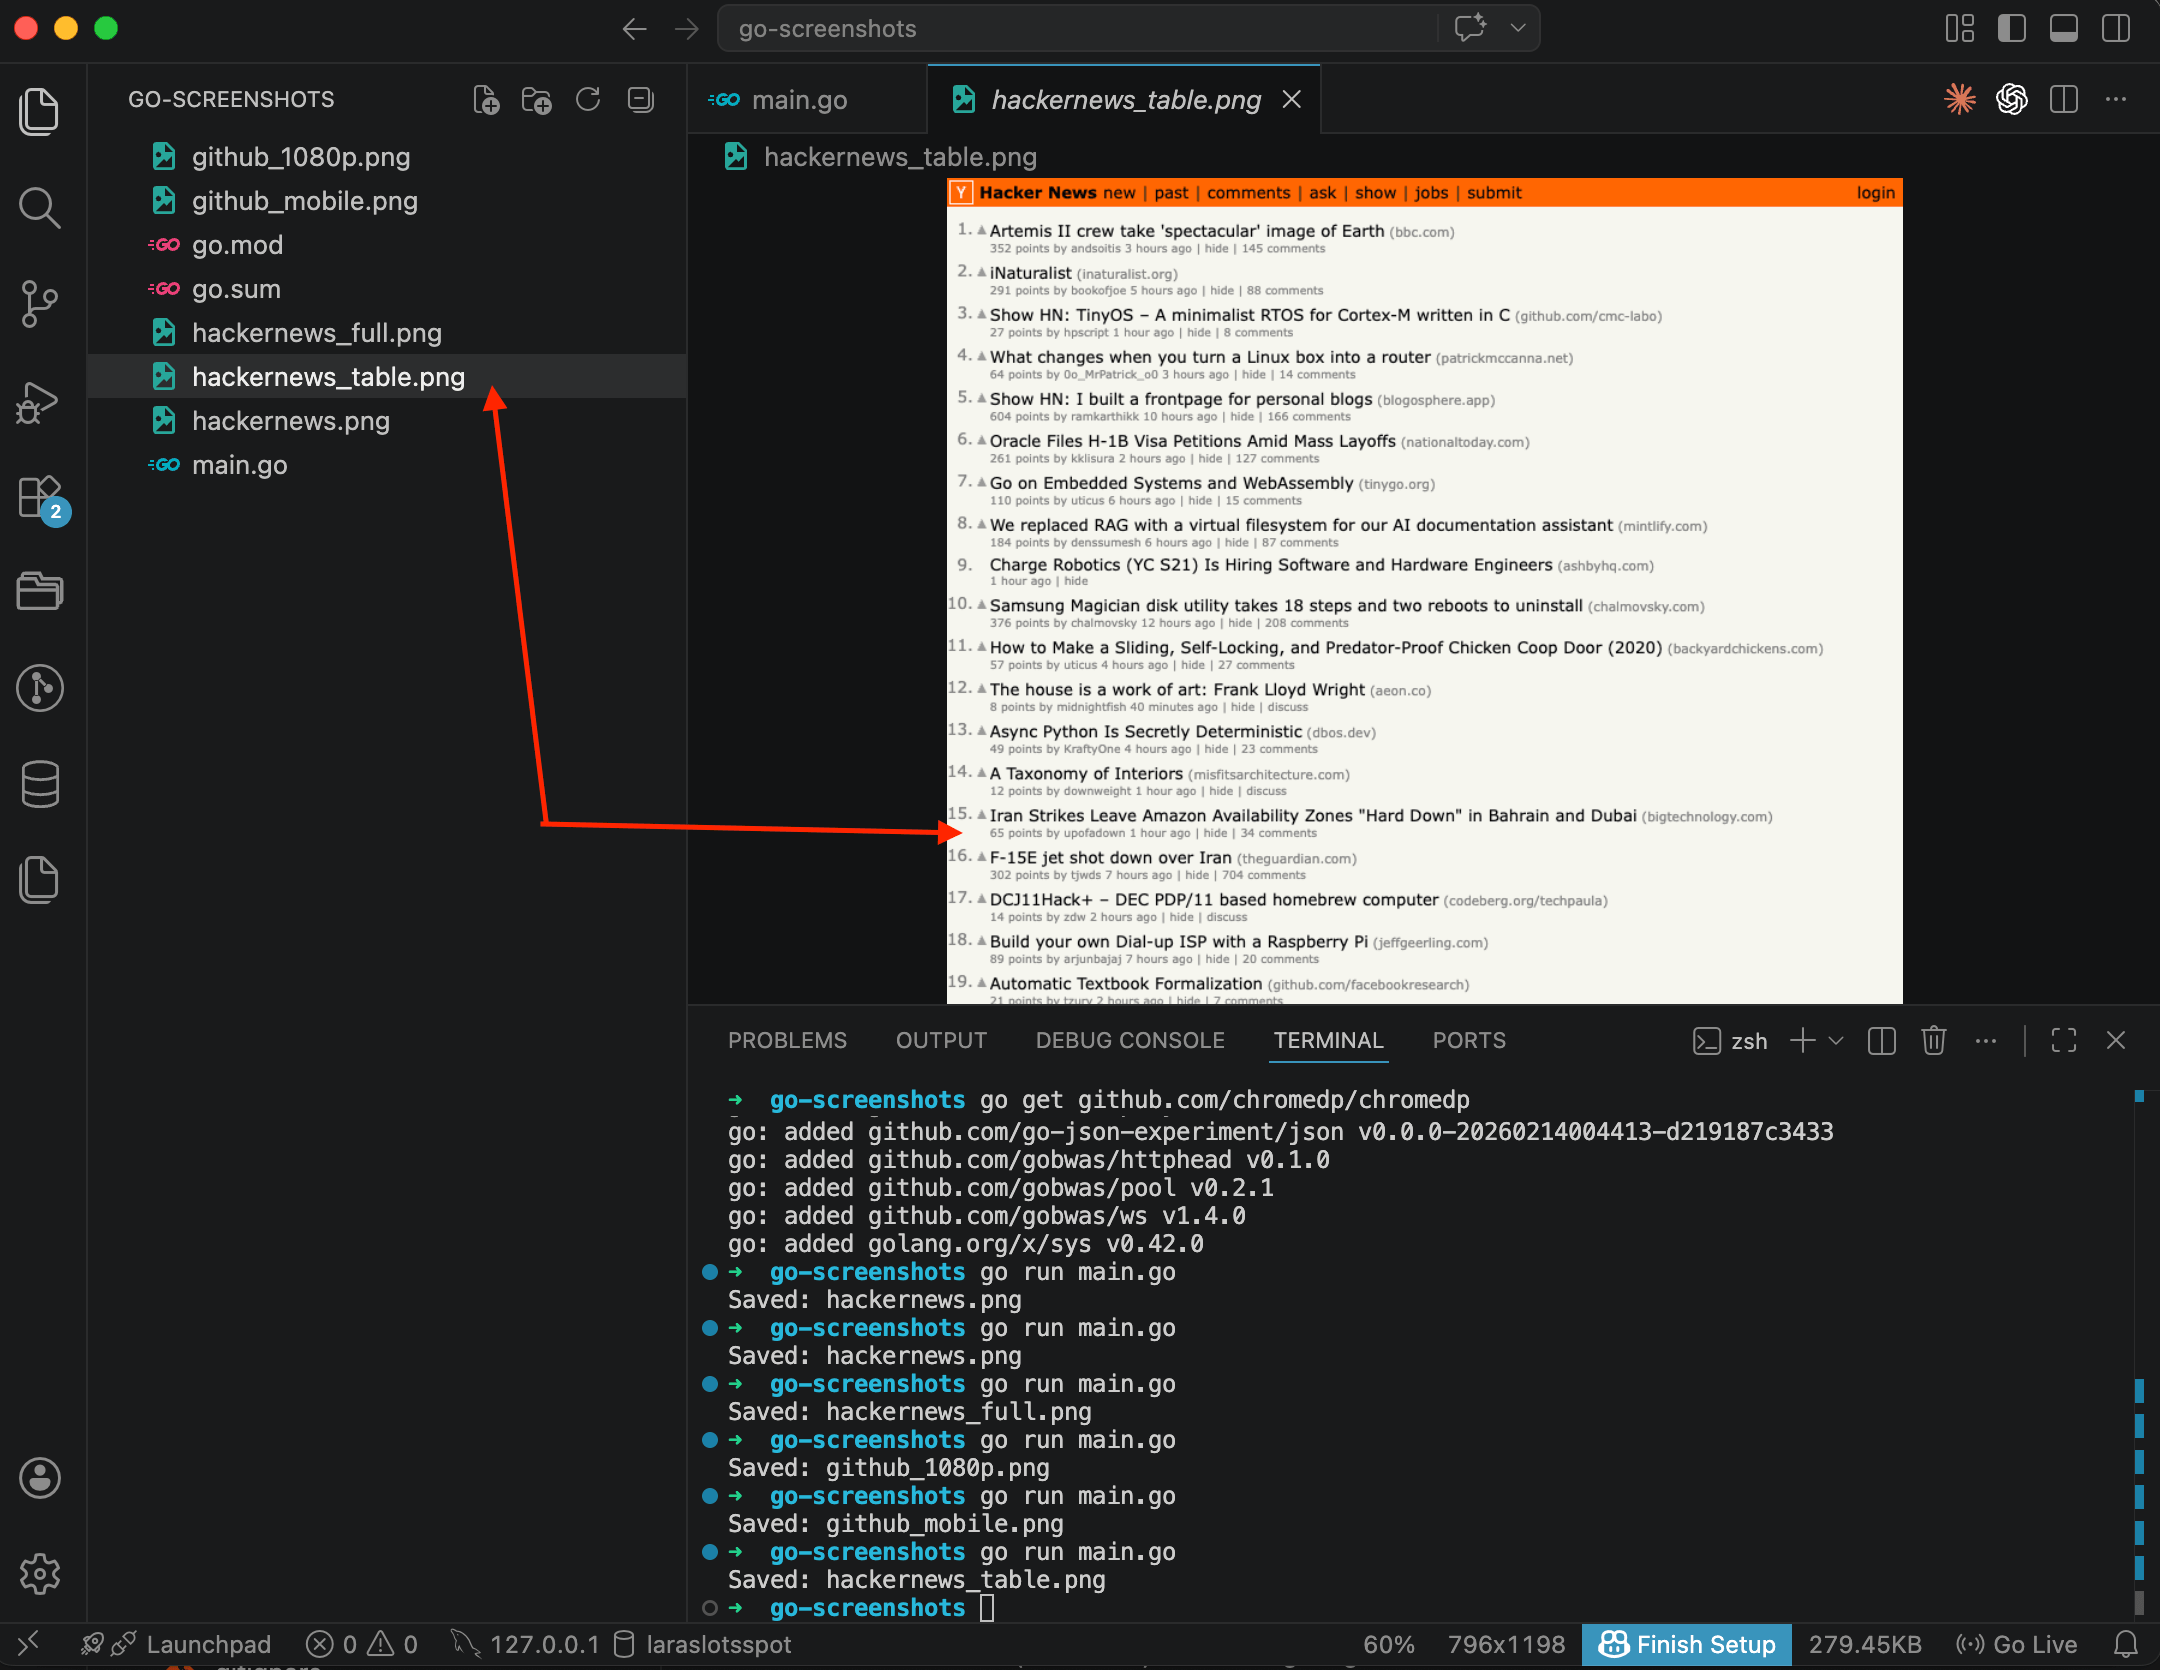
The result is just the Hacker News content: the list of posts with scores, authors, and comment counts. No extra whitespace, no footer. chromedp.Screenshot takes a CSS selector, a buffer, and the chromedp.NodeVisible option, which tells it to wait until the element is actually visible before capturing.
This is handy for monitoring: you can take a screenshot of a specific widget on a schedule and compare results over time. I wrote a separate post about capturing specific elements with CSS selectors if you want to go deeper.
Waiting for content to load
One of the most common problems: the screenshot fires before the page finishes loading. Dynamic content, lazy images, data fetched from APIs. All of that might not render in time.
chromedp gives you a few ways to wait:
// Wait for a specific element to appear
chromedp.WaitVisible(".main-content"),

// Wait until the element is in the DOM
chromedp.WaitReady("body"),

// Just wait (not ideal, but sometimes necessary)
chromedp.Sleep(3 * time.Second),
The most reliable option is WaitVisible with a CSS selector that you know exists on the fully loaded page. Sleep is a last resort for cases when you don't know which specific element to wait for.
Where chromedp gets awkward
After working with chromedp for a while, I ran into a few things worth mentioning.
Cookie banners are the same story as Playwright and Puppeteer. There's no built-in way to remove them. You can write JavaScript to click an "Accept" button or hide the banner with CSS injection, but every site has its own markup. At scale this turns into an endless game of adding new selectors. I wrote up the layered approach I ended up using (network blocking, CSS injection, and click-accept fallback) in a separate post on hiding cookie banners, ads, and chat widgets in screenshots.
Playwright ships a ready-made list of devices with the correct viewport, DPR, and user-agent for each one. In chromedp you set everything by hand. Fine for one or two devices. For ten, you'll want to build a wrapper.
Memory is the other thing. Each Chrome tab can burn through a few hundred megabytes. Need 10 parallel screenshots? That's 2-4 GB just for browsers. And chromedp won't manage a pool for you — you build that yourself.
Then there are fonts. Headless Chrome on a Linux server doesn't have the same fonts as your Mac. Screenshots in production will look different. You'll need to install font packages manually: fonts-liberation, fonts-noto for CJK support. By the time you're juggling browser pools, fonts, selector lists and memory tuning, it's worth asking whether running this yourself is still the right call. For a lighter approach, the Go screenshot API integration cuts out Chrome entirely.
Production gotchas I wish I'd known earlier
A few things I figured out along the way.
Always set a context timeout for chromedp. Without one, a hanging page will block your application forever:
ctx, cancel := context.WithTimeout(ctx, 30*time.Second)
defer cancel()
Same logic for API requests. The default http.DefaultClient has no timeout, so a request could hang indefinitely:
client := &http.Client{Timeout: 60 * time.Second}
resp, err := client.Do(req)
A subtle one about file format. In chromedp: quality 100 = PNG, below 100 = JPEG. With the API: pass format=png, format=jpeg, or format=webp explicitly.
chromedp runs Chrome in headless mode by default. If you need to see what's happening (for debugging), you can turn it off:
opts := append(chromedp.DefaultExecAllocatorOptions[:],
	chromedp.Flag("headless", false),
)
ctx, cancel := chromedp.NewExecAllocator(context.Background(), opts...)
Don't create a new context for every screenshot. One browser, multiple tabs. This saves 200+ MB of RAM for each additional screenshot.
If you're screenshotting the same URLs repeatedly, set up caching. I wrote a separate post about that: how to cache screenshots and stop paying for the same capture twice.
That's chromedp. Not as polished as Playwright's API, but it gets the job done without leaving Go, and the control you get over Chrome is close to what Node.js developers are used to.
If you need screenshots in production without managing Chrome yourself, take a look at the Go screenshot API integration page for a simpler approach using just the standard library.
Similar guides are available for Python, Node.js, and PHP, and Java.
Frequently Asked Questions
No. Go needs a running Chrome or Chromium instance to render web pages. The chromedp library communicates with Chrome through the DevTools Protocol, so Chrome has to be installed on the machine. The library finds it automatically.
chromedp is a pure Go library that controls Chrome via the DevTools Protocol. Playwright supports multiple browsers (Chromium, Firefox, WebKit) and has built-in device profiles. chromedp gives you lower-level control but requires more manual setup for things like mobile emulation and device pixel ratio.
Use chromedp.FullScreenshot instead of chromedp.CaptureScreenshot. Pass a quality value of 100 for PNG output. The function captures the entire scrollable page in a single image, from the top to the bottom.
Each Chrome tab uses a few hundred megabytes of memory. If you run 10 parallel screenshots, expect 2-4 GB of RAM usage just for the browser instances. Reusing a single browser context with multiple tabs helps reduce this.
For a few screenshots on a build server or locally, chromedp works well. For production workloads with many URLs, an API removes the need to manage Chrome processes, memory, fonts, and cookie banners on your own infrastructure.
Fix "Could Not Find Expected Browser (Chrome) Locally" in Puppeteer
Puppeteer cannot find Chrome? Fix the "could not find expected browser locally" error in Docker, CI/CD, serverless, monorepos, and local development.
Read more →
Fix Puppeteer "Browser Has Disconnected" Error (All Causes)
Read more →
Why Instagram Breaks Your Screenshots (And How to Fix It with Playwright)
Instagram shows two login popups, triggers React re-renders when you hide them wrong, and locks scrollHeight to the viewport. Three problems, three fixes for Playwright and Puppeteer.
Read more →